Pages

Performing Webslinger Mod


Tools needed:
  •  Phillips #0, #1, #2
  • Diagonal cutters
  • 4mm Allen wrench


  1. Cover tank with protective towel or blanket
 
  1. Remove plastic chrome meter bezel using 4mm Allen wrench.  Remove 2 front, 2 rear 4mm button head bolts.  Careful not to lose the rear rubber grommets or front metal collars. 


  1. Using long-reach Phillips #2 screwdriver, remove two truss head screws (one each side) connecting meter unit to handlebars.  Left side note: carefully remove zip tie affixing wire bundle to holder with diagonal cutters.

  1. Remove the following six Phillips #1 screws. (Do not remove two recessed or wire bundle stay.)
    1. Four around unit perimeter (one top, three bottom)
    2. Two at upper corners
    3. Black plastic housing will come off.  Careful not to lose the rubber seal between the two halves.


  1. Pull off speedometer needle.

  1. Remove two speedometer dial screws using a Phillips #0.  Pull off OEM dial face and set aside; it will not be reused.

  1. Place custom dial face in unit, secure with the two Phillips #0 screws.  Be sure to remove any fingerprints or smudges before securing.

  1. Reinsert needle and key ignition to “ON” position, allowing needle to sweep. Note where needle lands and readjust if necessary by removing and reinserting needle.

  1. Reinstall the housing with the six Phillips #1 screws (4 perimeter, 2 corners). Be sure black rubber seal is properly seated.

  1. Reinstall meter unit from underneath with the 2 truss head screws.

  1. Reinstall plastic chrome meter bezel using 4mm Allen wrench.

  1. Go for test ride, and enjoy!

Jack's O2 Mod

Installed in minutes today.  Can't wait to get out and try it!

This mod is intended to reduce the throttle surging of the 1300 at low speeds, particularly in conjunction with intake and exhaust modifications.  This "module" is a simple resistor that fools the oxygen sensor (located just before the catalytic converter on the stock muffler), into thinking that it is running a little more lean than reality.  Ideally, 14.7:1 A:F is what the ECU is expecting.  Jack's Mod makes the ECU think the output is leaner than 14.7:1. The ECU in turn tries to compensate for this "trick" and bumps up the amount of fuel, thus enriching the mix a bit to eliminate the surging and backfiring.

More details later.....

Custom Speedometer Dial

Thanks to Webslinger, Butterfly has a new set of wings!
Talk about professional - this guy worked with me on two dials, creating several different styles based off pics I sent of Butterfly's custom paint.  I contacted him late Friday night, Saturday we rallied emails back and forth on the design, and by Thursday it was installed (mailed from Seattle to Ohio)!  The new dial is made of high-temperature Lexan with a UV-resistant printed vinyl overlay.

Here's the how-to!

Webslinger Custom Speedo Dial

Roadhouse Slip-On Repack

Thanks to another forum member on the Delphi 1300 site, I bought a gently used Roadhouse slip-on. It sounds great, but there is a bit of a harshness that comes about these mufflers after a few thousand miles of use.  Read on to find out why your stock muffler never needed repacked, yet aftermarkets will.

There are two means to quiet the exhaust systems found on most street bikes today: restrictive and absorption mufflers. 

The stock muffler falls under the restrictive category.  It uses a steel baffle design, which causes disruption of the sound waves by redirecting them through a series of plates, or baffles.  These baffles are permanent, and unless corrosion is an issue, never really need replaced.  They restrict the amount of air flowing out and disrupt the air flow pattern.

In contrast, most aftermarket pipes, which are notably louder in volume, are absorption-type systems.  They do not have plates to redirect sound at all, so these are called "cores".  They use consumable products like fiberglass or stainless "steel wool" to soak up the waves, sometimes in conjunction with a perforated core. Over time, the packing burns and disintegrates and the bike sounds progressively louder. To return to the original sound, the core must be repacked with some heat-tolerant material.

There are no true "baffles" on the Roadhouse Slip-Ons.  If you hold the muffler to the light, you will notice the catalytic converter is gone, and you will be able to see straight through it. The standard core has perforations and indentations downward into the path of the outward airflow.  The quiet core also has indentations, but these protrude even further into the hollow center of the muffler, causing additional airflow disruption. Not quite as much as a baffle, but enough to prevent the straight-through tunneling effect of a solid core (think in comparison to straight pipes, Cherry Bombs, etc).

So, how do we quiet the Roadhouse Slip-On?  Two ways - either repack the standard core with more sound absorbing (yet flame-proof) material, or install the quiet core.

To remove the Slip-On's core, you will need to remove the slash tip and the retaining bolt.  The tip is removed with two bolts, one on the underside and the other on the tire-side.  The core's retaining bolt is just beside the tip underneath.  Now for the fun part of removing the core itself.  I found that a paint can opener (the type with a teardrop handle at one end and a little lip at the other) works well.  Hook the lip onto the first perforation you can grab, and give a gentle yank.  This may have been a little more difficult because of the prior use, but a pair of pliers wrapped in a towel should work on newer mufflers.

Once I removed the core, I noticed that about 1/3 of the original packing was pretty well scorched and disintegrated.  I unwrapped the fiberglass portion to reveal a small segment of stainless "steel wool" which was also scorched, but usable.

My local Ace Hardware had stove door rope (for wood burning and pellet stoves) which is high temperature, and pretty dense.  These come in 7' lengths, so I bought two packages.  I tied the ends of the rope to the first and last rows of perforations, and wrapped the rope taut over the steel wool.  Reinstall and ride.  This should be closer to the standard core. 


I also placed the original fiberglass mat back over the rope.

Roadhouse Slip-On

Kaaaapowwwww!

Very heavy sound to it, not tinny, no barking, no crackling.  Just a deep heavy thump. It took a while of "sweet persuasion" to get it to fit properly.  The OEM lead pipe heat shield was a little out of line for the muffler, but that could be due to "Butterfly" being lowered. Maybe. Doesn't matter because just about all slip-ons require some tweaking.  I guess if it just goes on in 15 minutes or less you are considered fortunate.

Read my Repacking for more info.....

J&M CB Radio

As an amature radio enthusiast, I felt at home with the installation of the J&M CB radio. 

I cannot emphasize enough the importance of the following:
  • QUALITY antenna 
  • QUALITY feedline
  • SUFFICIENT ground

Honestly, I do not care for the J&M brand antenna - it does not cut the mustard in terms of build quality and grounding abilities. 

Antenna...
I would use a more sturdy Firestik or Wilson brand fiberglass antenna.  With the saddlebags installed, the 3' antenna works fine.  However, I do not recommend going with a shorty 2' stick because the radiation pattern will be blocked if you follow my mounting suggestion. Regardless of the style, opt for the adjustable tunable tip model (those with a screw top). Cut-to-tune antennae are more difficult because they are easy to over-shorten (cut down too far) and once this happens the antenna is about as good as garbage.
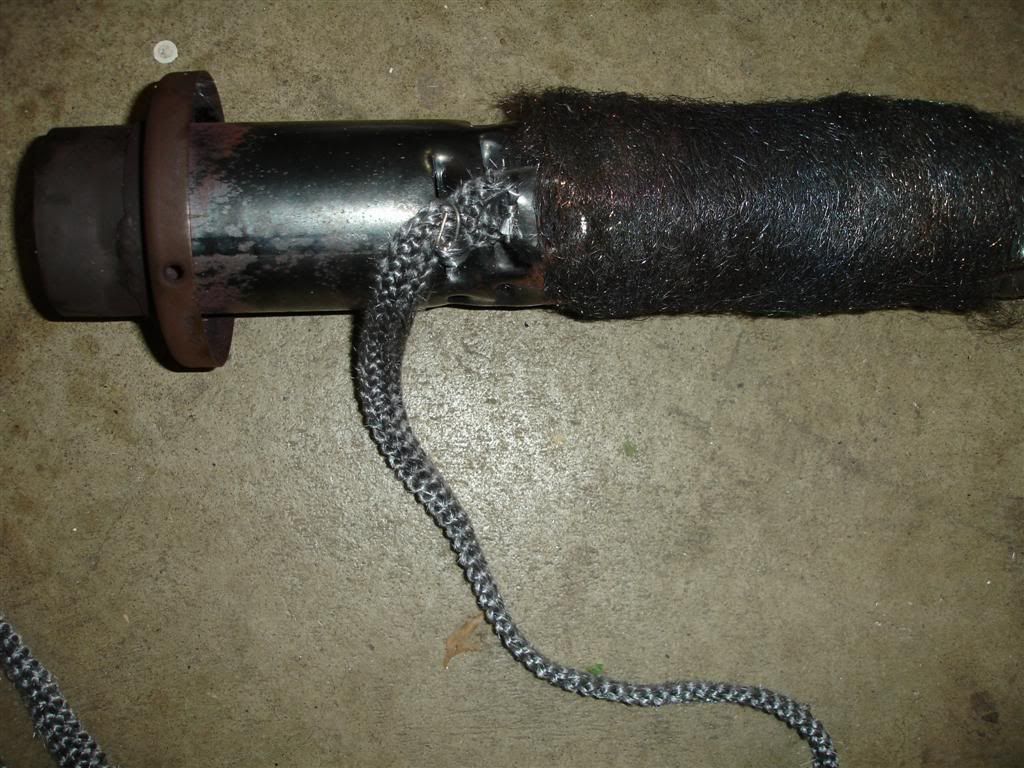
Feedline...
I know it is somewhat pricey per foot, but you can get away with a weaker ground plane that motorcycles provide by using higher quality, ultra low loss coaxial cable.  I opted for Times Microwave LMR400 Ultra Flex.  This is an outdoor cable that can take a pounding. The center conductor of Ultra Flex is stranded (not solid), so it can make the tight bends required for bike install without the concern of breaking the core. Any ham or electronics retailer should be able to locate this for you.  Also check Ebay for premade cables.

Grounding your setup...
Motorcycles pose a significant challenge for providing sufficient amount of grounding material because they are small, lightweight and often use plastics.  The V-Star Customs are particularly difficult because of the plastic rear fender.  Ideally, the following should be observed:
  • Use 12ga wire as a minimum if a separate ground wire is used. This is the case of the J&M brand, and they skimp on the ground wire - I recommend a braided copper strap.
  • Use as much coax feedline as you can during the install. 
  • You MUST have at least 9 contiguous square feet of metallic grounding material.  The frame and fenders of most bikes can provide this if there are no insulating bushings to prevent the contiguous surface. If 9sq/ft are not directly available, install approx 17' of feedline (RG-8X is fine), and do not coil it.
  • Try to minimize anything that blocks the radiating pattern of the antenna (luggage, flags, etc). The antenna is most efficient when it has a direct path to the recipient.
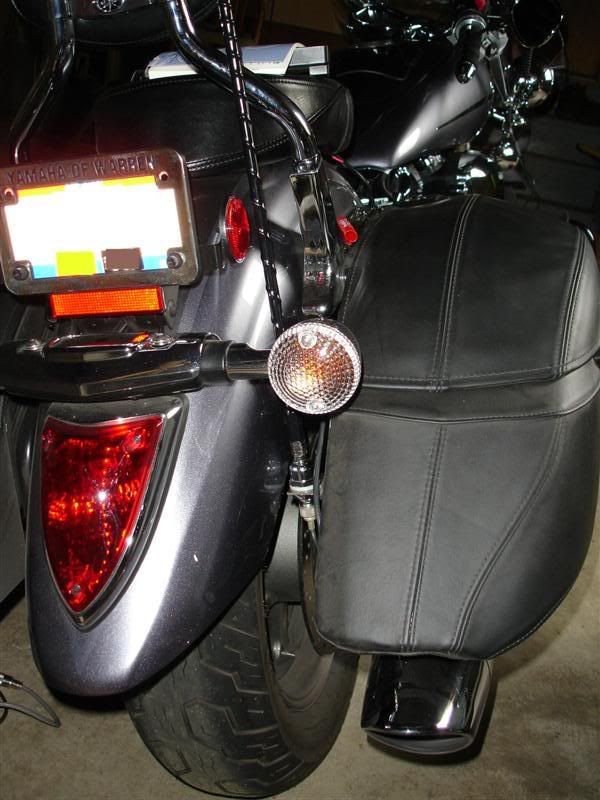
Mounting your antenna on a V-Star 950/1300 Tourers...
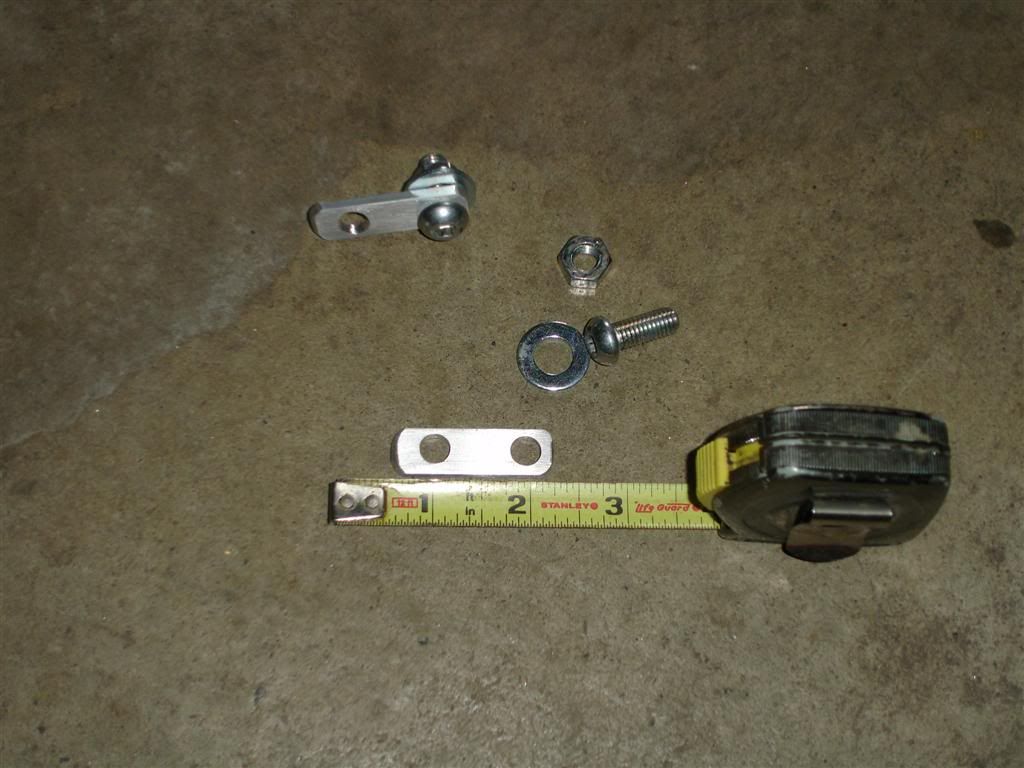
The 950 and 1300 Tourers provide an excellent antenna mounting point on their saddlebag mounts. A simple piece of angle iron can be cut and used as a bracket for attaching the antenna to the mount.


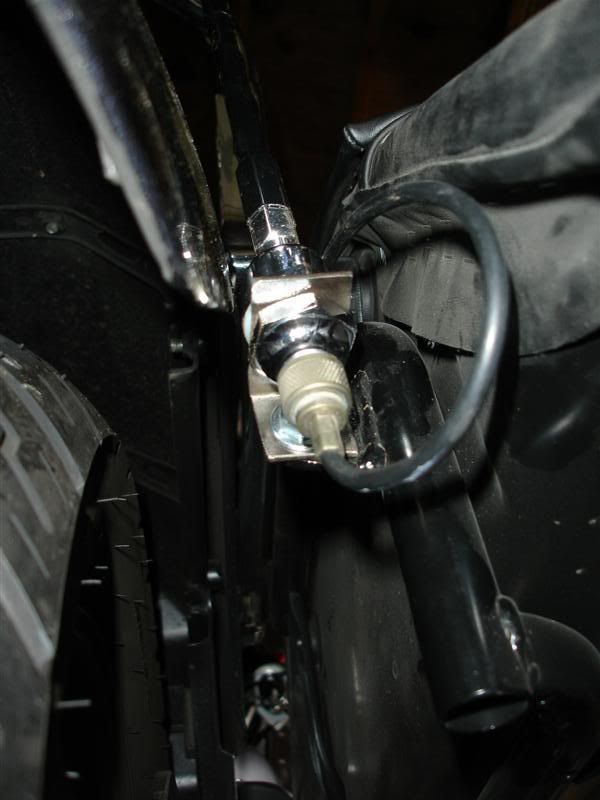
Your local truck stop carries a multitude of CB install and test equipment.  A few things you will want to pick up there are:
  • a SWR meter (to measure efficiency so that you don't burn up your new transmitter - YES, it CAN easily happen if a solid ground is not achieved)
  • the antenna
  • a stud mount to connect the antenna to the angle iron bracket.
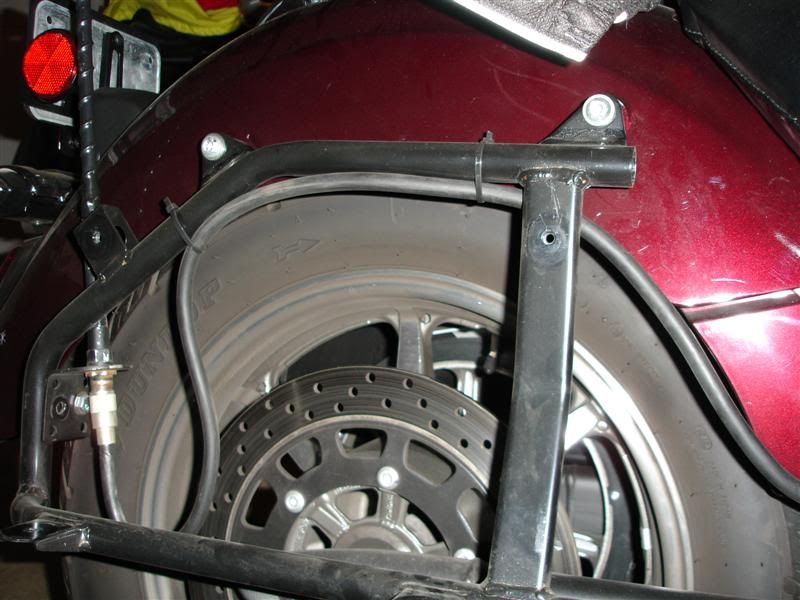
Here's another view with the saddlebag removed:

Installing the radio...
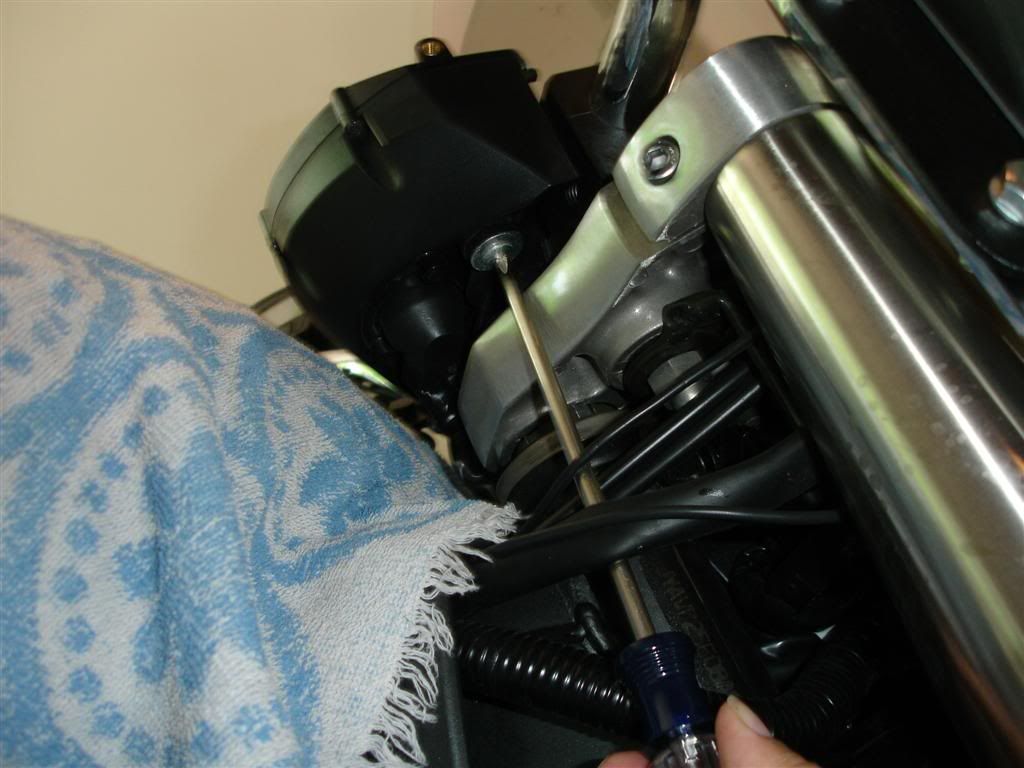
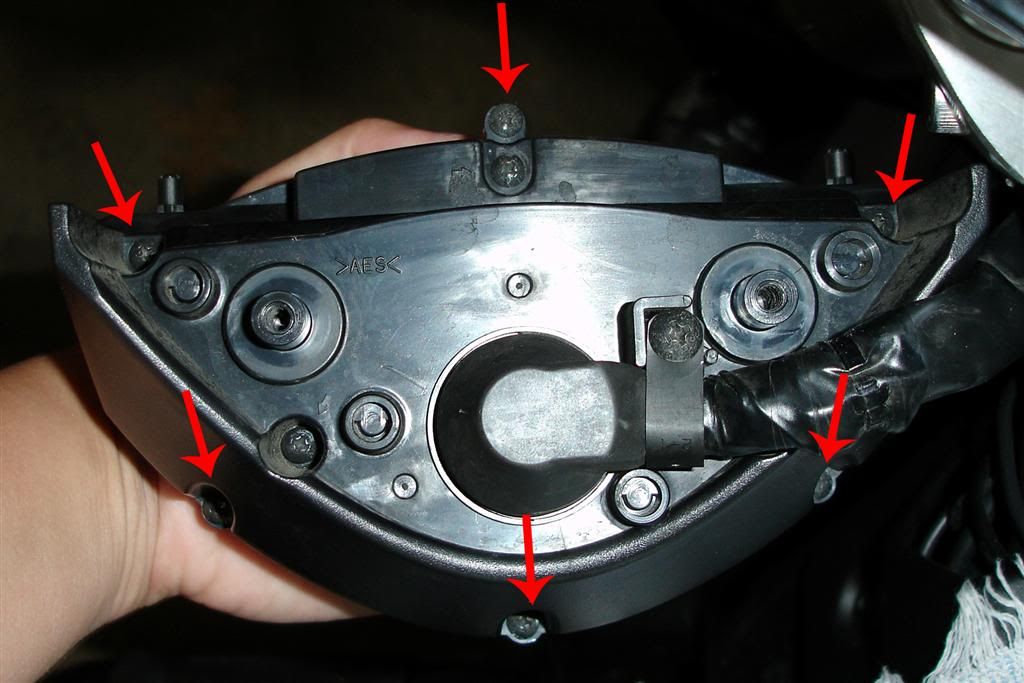
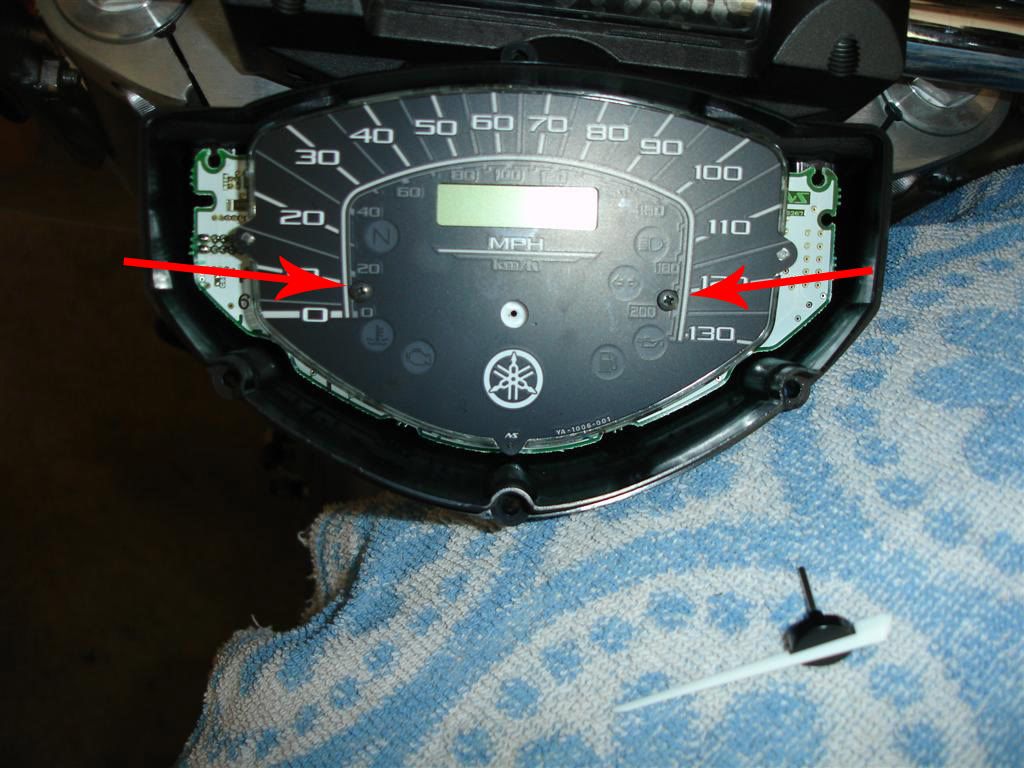
One tip is to loosen the tank to feed the coax cable and J&M connections through easier.  Make connections per J&M's instructions. You may also want to use dielectric grease between the male and female connections.  It is a non-conductive sealant to ward off moisture and corrosion at the connection points. The 1300 has a really handy neck cover where the bulk of the connections can be hidden.  The front is an Allen head bolt and the rear is a screw-type pop rivet.  Once both fasteners are removed, the neck cover comes off like a clam shell.

Finishing up the job....
This is where the SWR meter comes in handy.  Connect the meter between the antenna and radio.  Tune the radio to channel 10, on low power.  Key the mike and watch where the needle spikes.  Ideally, the SWR should be as close to 1 as possible. Anything up to 2.5 is acceptable, but the closer to 1, the better your buddies will hear your transmission.  Move down to channel 1 (the motorcyclist's channel) and again key the mike.  Observe where the needle spikes.
  • If the SWR on channel 1 is higher than channel 10, then the system is short (physically and electrically). You will need to tune your antenna up by lengthening your tip. 
  • If the SWR of channel 1 is lower than channel 10, then the system is long. You will need to tune your antenna down.  This is where an adjustable tip antenna is preferred.
If you have tuned your antenna to the longest setting and are still experiencing high SWR, then there is insufficient ground.  If you have observed all the standard rules of grounding, then you need to get creative with creating a ground.  You can add spring coils (again, found at truck stops), a heavier mounting stud, a longer (4') antenna, adding a metal plate behind the fender, etc.

Each time you test SWR, be sure you will be in a similar condition as when you will transmit.  For example, test in an open area away from walls or other conductors, install luggage or have a passenger sit on the seat, and always replace the protective dust cap - even THAT will change your SWR.

Here's a good source for CB info and troubleshooting: http://www.firestik.com/Tech_Docs.htm

Enjoy the ride!
  
73! ... oh, wait, wrong band. Uh, "Over and out good buddy!"
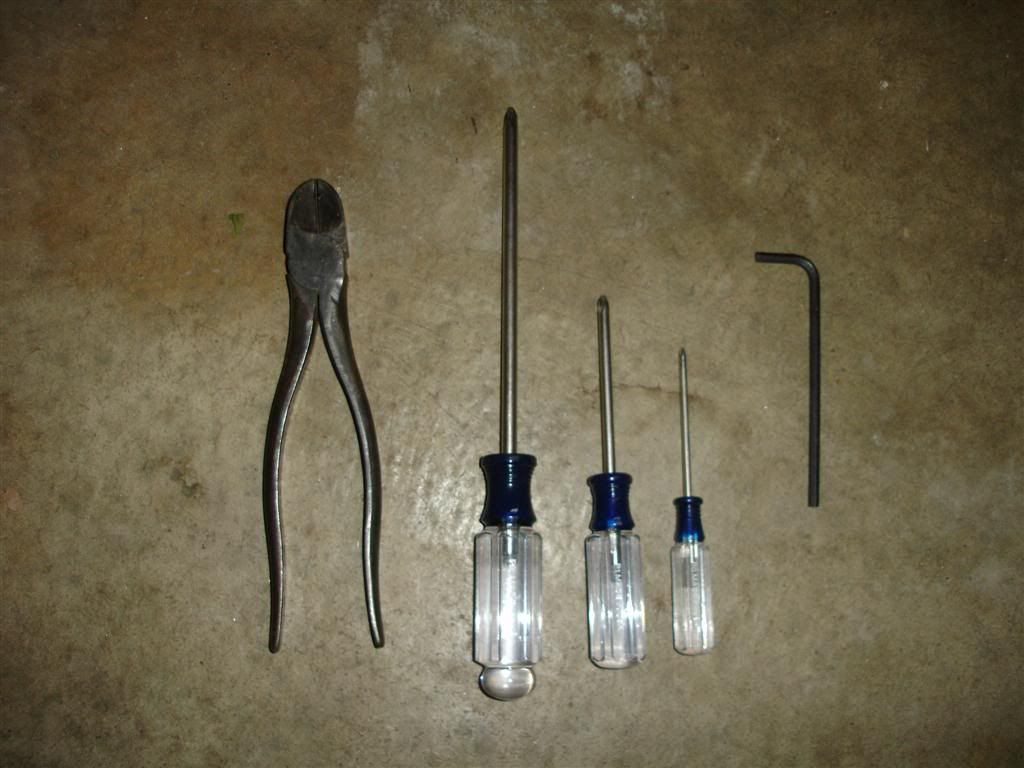
Rear Fender Rack

Another Star Genuine accessory that changes the look of the 1300.  To install, you need to remove the passenger seat and mounting hardware. 

  • Remove the Driver's seat using the ignition key.
  • Remove two hex head bolts facing forward under the passenger seat.
  • Slide passenger seat forward to pull off.
  • Remove the two hex bolts that attach the seat retainer to the fender.  
    • Store or sell your passenger seat.  If you store it, use the original seat holes to save the mounting hardware.
  • Use provided spacers for fender rack.
  • Use blue Locktite and carefully tighten. 
  • Enjoy!

Lock your Lid!

Here's another innovative idea from the guys at Kewl Metal: Kewlocks.  Most bikes have their helmet holder in a rather inconvenient spot.  The Kewlocks place them in an easy-to-reach spot - right at the end of your handlebars!

Not only do these sweet looking chunks of chrome look good and lock your lid, but they also function as bar end weights.

These attach to the ends of Kuryakyn grips (Iso, Flame, Transformers) and are sold either singly or as a pair ($70 est).

More Lights - Rear Visibility!

I love this piece! Super easy install - took less time than installing fender tips! The Kuryakyn Triple Whammy lights up the backside as a run-turn-brake controller.  The turn signals gain another use as rear red running lights, and illuminate steady or modulated when the brake is applied.

Click below for video.......

DIY Driver's Backrest

Took a piece of mild steel flat stock and banged the bloody heck out of it over an I beam. The backrest bracket is sandwiched between the fender and the driver seat rear anchor.

Need to trim the corners off and grind it down, and I think I'm going to coat it with that Plasti-Dip from Harbor Freight. Otherwise, I think it is perfect!


__________________

Tint your windshield!

Well, did hubby's windshield today. A cool $14 mod that really made him smile.

Bought a roll of adhesive window tint from the local Pep Boys. This is 35% VLT (visible light transmitted). My "Butterfly" is a lot darker, but hubby looks through his shield so it needed to be lighter. If in doubt, check with local law. Meh.

To do this you should have the following tools ready:
- Very sharp (brand new) Exacto blade
- Scotch tape
- Scissors
- Sticker On! (or liquid Dawn & water solution in a spray bottle)
- Lint-free rag
- Squeegee (or a credit card wrapped in the lint-free rag)


  1. I cleaned the windshield with Plexus (my favorite windshield cleaner) and a lint-free rag.
  2. Lay out the windshield on a clean, dust-free floor and unroll the window tint to estimate the size. As you unroll the tint, spritz a little Sticker On! or Dawn/water solution on the plastic to eliminate static cling.
  3. Cut the tint at least one full inch more than the size of the windshield itself to allow some "wiggle room" for error.
  4. Liberally apply the water solution or Sticker On! to the shield itself. You want enough water solution to be able to "float" the tint and be able to reposition it easily. Don't worry, you'll squeegee out the excess, so spritz away!
  5. Peel back the protective backing to the tint, exposing the adhesive side. Go ahead and spray the adhesive as well - it will become tacky again, trust me!
  6. Set the tint in place and begin to squeegee out all bubbles and excess water. This will take some time. Work the bubbles to the nearest edge. You may not get it all today, but that's ok. Just heat the tinted side of the windshield with a hair dryer and begin working them out later.
  7. Once you have most of the bubbles and water out, then take your very, very sharp Exacto knife to the edges. I prefer this way, but you can cut to exact shape and size before you remove the protective backing. Hold the knife at a shallow and low angle and glide over the edge of your shield. With a little practice, you should have a very well trimmed out tint.


Here's the coolness of my tinted shield

Flame Floorboard Covers (Kuryakyn)

Here's another cool idea to jazz up the drab floorboards of the V-Star lineup!  Kuryakyn makes Iso and Flame floorboard covers which are just dripping in heavy chrome!

The floaty feeling the stock boards have is now gone.

They do not seem slippery at all. I was concerned, but the rubber is very elevated, which you can't tell in any of their product pics.

I like the added space - I can move my little boot all around it now in many different positions, and there is even a lip on the back end that my feet fit nicely. However, it is that spot that concerns me for durability. I can't ride as hard in turns or I'll likely end up replacing them in a year. 
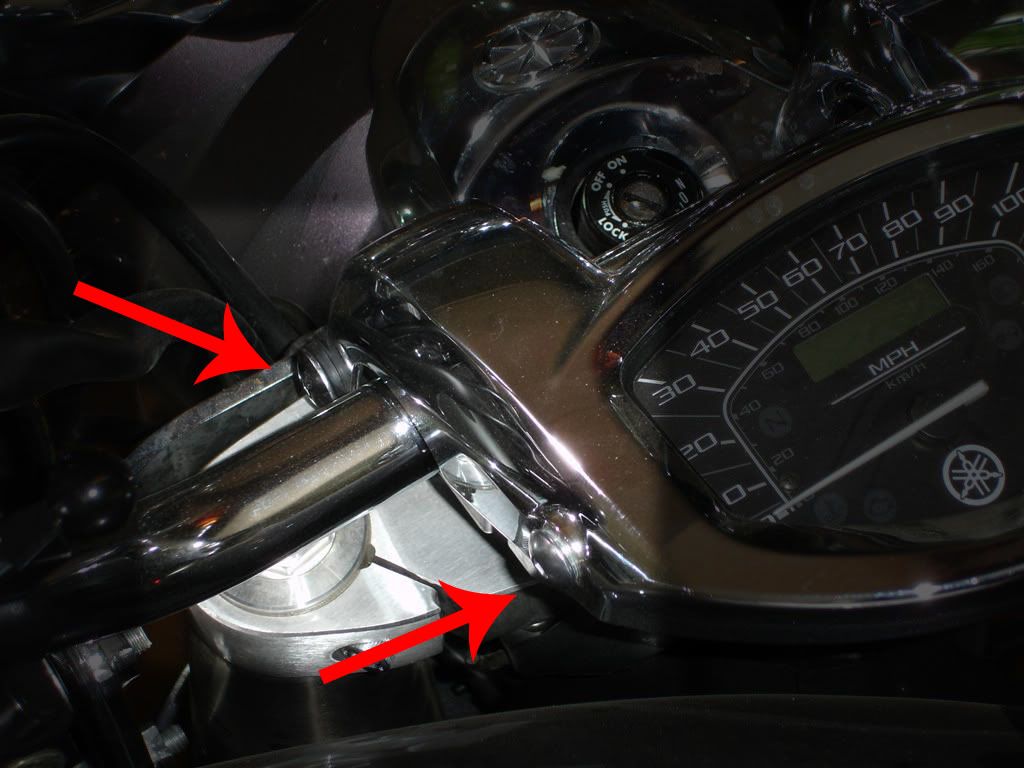
Don't forget, Butterfly is slammed 3", so most normal and commercially lowered 1300's might not suffer this problem. I am going to take the "curb feelers" to Fastenal or Tractor Supply to look for a half-dozen replacements to keep on hand.

Very, very minimal vibration. If it becomes bothersome, I might add some silicone to the bottom, but that's unlikely necessary.

I did find the point of scrape - and it isn't as bad as I thought. We took a ride through some beautiful twisties between SW Pa, WVa and SE Ohio, and put it to the test. Had a few good gashes on a 180* decreasing radius and another hairpin, but it was the DR that had me grinding my anti-tip peg again!!!

For the install.......

Here's what you need:
Flat screwdriver
8mm deep socket
4mm hex

Kuryakyn supplies a pair of curb feelers (installed with 8mm) and six 4mm button cap bolts and washers (install three on each side).


Use the screwdriver to pry off the OEM floorboard rubber, pushing inward and up. There are three spots the rubber anchors into the floorboards. Set the rubber pieces in the "1300 spare parts bin".


The three holes are where the Kuryakyn bolts go.


Don't forget the curb feelers, although I'm not sure they won't last long.

__

Windshield Tilt

Here's a quick way to get better airflow for shorter riders.  I made a small extension piece to push forward the bottom attachment point of the windshield mount.  The holes are 1" on center. 

Here's a comparison of the tilt and non-tilted shields:

Grip diameters

Here's a quick comparison of grip sizes for the 1300, starting from
the smallest to largest...

Stock grip: 4 1/2"
Flame grip: 5 3/8"
Iso grip: 5 1/2"

Cable Lube

Just do it!

This is one of the most frequently overlooked aspects of preventative
maintenance, yet is key to prolonging cable life and ease of use.

Simple shot of graphite lubricant into the cable opening (pull clutch
lever in to expose cable) and viola! Done!

Stay away from evaporative lubes like WD-40, because they will dry and
leave you with little to no lubrication after a short period of time.
White lithium is another option to reduce wire friction, but because
of its weight, it is difficult to travel through the entire length of
cable. Moly lube (graphite) seems to be the best option. However, if
you have Teflon cables (usually only found on aftermarket cables), do
NOT apply any lubricant other than what is recommended by the cable
manufacturer.

Your cables will reward you with miles upon miles of worry-free use,
and you will find the cables move more freely and are easier to pull.
This is great, especially for us riders with small hands. We need all
the assistance we can get for heavy clutches anyway! ;)

Stock Airbox Mod

This is the intermediate step between an open breathing performance intake and the stock setup. I utilized the stock airbox back (the black plastic housing), a couple of Dremel cutoff discs and window screen mesh. Now the bike can breathe a little easier in comparison to the highly restricted stock box.

First, the airbox must be removed from the bike. The throttle body will then be exposed, so be sure you keep it clean with a covering. To remove the airbox, unscrew the four hex bolts from the chrome cover. Set it aside and remove the air filter. Now is a good time to inspect it and either replace with another OEM filter or a higher flowing K&N OEM-style filter. Some have reported increased intake with the K&N, but it is a reuseable filter anyway, so it is win-win.


Next, remove the three bolts on the throttle body (two on the side and one under the velocity stacks). The black portion will now come off, and it is cutting time!

Trace a rectangular pattern on the sides of the box. Near the bottom means it is less visible, but be sure not to place the holes where the intake will suck in warm engine air.  I used a business card and a white grease pencil to help me with the pattern.
Using your Dremel or other cutting tool, remove the panels.


To fill the new holes, I had aluminum insect mesh and window screen material available. The window screen was black and aluminum was unpainted. Use whatever material you like, so long as it has holes small enough that water will not be able to easily penetrate through. I glued the mesh to the inside with Goo, and edged the cutout with thin gauge black wire for a finished look.

Finally, go and enjoy your new ride! You should begin to see an improvement in performance and gas mileage.

Click below to start the comparison video of stock, modded stock and full performance air intakes:

Seat Shootout: Ultimate, Mustang, Corbin

Stock seats suck.  I've had the fortunate experience to own and compare the Mustang with driver backrest, Corbin Dual Tour and the Ultimate midrider with driver backrest.  The Mustang and Corbin were installed on my 950, and my hubby is about to lose his Ultimate off his 1300.  Here's the lowdown on each:

1) Corbin: One-piece molded seat. very firm, little padding. Reminiscent of an equestrian saddle. Advantage and comfort is in the shape of the seat and the high back. Dual Tour is only model made at this time; no solo seat available. Durable and weather resistant. No memory foam. Wide variety of material colors, styles and patterns. Available in vinyl, leather or fabric. The nose can be custom cut for shorter riders, but this also removes some padding. Removable driver backrest may be added at any time after purchase. Seat position moves rider away from handlebars due to angles seat back, but the seat back really wraps around the lumbar region and locks the rider into place. Disadvantage is lack of padding and seat rests on frame without much to prevent transmission of road vibration to rider. Break-in is like a leather saddle and can take a while. Corbin offers a heated version of the Dual Tour; very nice for us northerners.

2) Mustang: middleweight in padding. Absorbs road vibration well, yet still allows rider to recognize he/she is still riding a v-twin. Well padded at seat edges. Cheaper alternative to Ultimate Seat. Advantage goes to its value and availability. Cannot be custom fit; only color available is black vinyl. Weather resistant. Very short break-in time. Driver backrest MUST be purchased at the same time of the seat, and is adjustable. Seat position gives the feeling of moving up and forward due to the different angle. This new angle is very well ergonomically engineered to provide support and proper pelvic tilt.

3) Ultimate (based on 1300): most plush foam seat available. Costly, but most vibration reducing seat on the market. Advantage to hour-after-hour comfort. Although weather resistant, the foam seems to be most sensitive to water penetration. Ultimate addresses this by selling rain covers made of Frogg Togg material. May be custom ordered with color side panels, custom embroidery or color stitching. Also available in leather, but stock is black vinyl. Seating position raises rider up (more than Mustang) and slightly forward due to thick foam material. Driver backrest may be ordered and installed afterward, but an optional pouch on the backrest must be ordered at the same time as the backrest. Backrest is fully adjustable. Disadvantage is cost, but exceptionally worthwhile for touring. Despite manufacturer's website, the Ultimate rider's seat CAN be used in conjunction with the stock passenger seat.

Chrome Reservoir Cover

Another dark area on the 1300 is the front brake master cylinder reservoir. Singing the praises of chrome, Kuryakyn came to my rescue again. This simple, yet gorgeous, piece of bling is among the easiest frills to install on the bike. It consists of a cover which completely encases the top and all sides of the master cylinder, and Kuryakyn provides a replacement handlebar clamp as well as chromed hardware neatly packaged in protective wrap. The best part of this cover is that the view window is still visible.

To install: remove the master cylinder screws from the reservoir's lid using a quality Phillips screwdriver. Do NOT remove the lid itself, just the screws. These screws are made of very soft metal, and they strip easily, which is why extra caution should be exercised when removing them. Next, place the new chrome housing over the master cylinder and oem black lid. Use the provided chrome hardware to secure the new housing. Finally, remove the oem black clamp and replace with the chrome clamp and hardware. You're done - go ride! Much better on the eyes, and not too heavy on the pocketbook.

Photobucket

Chrome Switch Housings

Yamaha made it, I'm making it my own. Well, they sure give me plenty of room for improvement in the  controls department. The matte charcoal switch housings leave a lot to be desired. Surely the bike could afford a little more natural-born beauty such as stock chrome housings; but no, Yamaha leaves us on our own to jazz up the 1300. Heck, even the 650 has chromed or polished housings. But I digress.

I bought my Show Chrome chrome switch housings from my favorite local dealer, Yamaha of Warren. Now, these are not like the cheap Kuryakyn covers you slap over top of the switches and the buttons end up being recessed. Nope. The Show Chromes are actual housing replacements, and they truly look like they are an OEM item meant for this bike. Once you install these puppies, toss out your old ones (or polish them for your spouse's bike - for which he shall forever kiss my riding boots).

The install was relatively easy, but very time consuming. There are many wire harnesses that are located within the housing, and you have to remember the order you disassemble so that you can reassemble properly. Luckily I did not have to individually change each wire over, else they may have just as well have been sprayed "chrome".

Rear Fender Rack

What a huge, honking piece of bling! This rear fender rack, or solo rack, is a Yamaha Genuine Accessory
made of chunky 6061 billet.

Very easy to install, and makes the bike look even more sleek and low slung than what it is already. To make the solo conversion, you must first remove the rear passenger seat. Using your 1300's ignition key, remove the driver's seat and place it off to the side. Looking back under the passenger seat, you will find two bolts facing you. Use a 10mm(?) socket with a 2" extension bit to remove these two bolts. Now you should be able to slide the seat forward (there is a tab at the back of the seat) and then upward to remove. Easy enough. Now we are left with two brackets and a few square clear vinyl stickers remaining on our rear fender. Using your socket, carefully remove these two brackets from the fender as to not scratch the paint with either the tool or hardware. It's easy to do. Put the brackets on the left over seat or toss them in a baggie. You won't reuse them again unless you reinstall the seat.Wait for a nice warm day, or very cautiously use a hair dryer to remove the protective stickers. If you manually apply heat, do not get the fender too hot, as it is easy to blister the paint. I just leave the bike parked inthe sun, then it just peels off.

Now installing the rack is jus as easy as removing the seat. Two larger spacers go toward the front of the bike, and two shorter ones are installed toward the rear. Blue Locktite and you are good to go!

Enjoy the ride!

RSTD Handlebars

A much more comfortable alternative to the stock handlebars. Be sure to place a thick towel or other protective covering on your tank before you begin. Also, an assistant is helpful, but not necessary. Once you loosen the bar clamps and controls it is easy to ding and dent the tank and other pretty parts. I did this project alone, but wrapped the dangling controls in bubble wrap and towels as I removed them.

Ok, first, remove the windshield if one is installed. It makes the job a heck of a lot easier.

Remove the clutch side grip. You might need to insert a flat screwdriver and squirt WD-40 into it to slip it off. Compressed air also works well if you have access.

Loosen the clutch perch from the underside and let it dangle. Wrap with a towel to prevent damage.

 Loosen the brake side controls.  There are two Phillips screws behind the housing, then the housing will come apart like a clam shell.  Don't take this off yet.

Next, remove the plasti-chrome speedometer housing cover. There are two allen head bolts toward the rear. Be careful that you don't loose the copper bushings inside.


Loosen the handlebar clamps.  BE CAREFUL - in a blink of an eye the bars can come down and smack the tank. Wake your assistant up to hold them.

Slide the bars toward the clutch side.  You will need to slide the clutch perch also.  Slip off the throttle grip and throttle side control housings. Wrap with a towel to prevent damage. This is a great time to change grips if interested.

Remove the handlebars from the clamps.

Slide clutch perch off.

Reverse directions to reinstall with RSTD grips.

Considering SPyKER Mod

I'm really digging this look.

http://www.whypush.com/

The Thunder kit I had on my 950 was absolutely phenomenal, especially coupled with the drilled exhaust - really mean sounding for a sub-1000cc machine. However, the constant hissing at highway speeds for hours on end was just too much for my baby-sensitive ears to handle.

I like the SPyKER filter mod. Although it does about what the airbox drill mod (75+ small holes on either side of the OEM cover), it does it with style and panache! Not too loud, but still enough to give it a little punch. I think I will be ordering very soon!

Soooo... which grill to get??? Help me decide!

Today's Work


Today I installed the rear fender rack.


The handlebar area of the 1300 leaves a lot to be desired, so I also made these changes:
  • Installed the RSTD bars (for comfort - provides a couple more inches pullback that us shorter riders require)
  • Installed Kuryakyn Iso grips
  • Installed the Brake Away Cruise Control
  • Added color-matched accent rings for the Iso grips (courtesy Revlon and automotive topcoat)
  • Installed Kewlocks helmet locks on the end of the Iso grips
  • Removed the dull matte black switch housings and installed pretty chrome bling housings (Show Chrome). This took a while to remove all internals, and would have taken even longer if I didn't have the enclosed instructions. Would I buy these covers again - probably not. I'm polishing my old OEM ones for my husband to install on his. Or rather I'll install on his bike.
  • Installed a chrome cover for the front brake master cylinder (Kuryakyn). This isn't just the lid to the master cylinder, but instead a complete case that covers the sides and the handlebar mount - very sharp!


I made the mistake of taking the windshield off. OK this isn't normally a bad thing, but when I saw the looks of the bike without it, I just had to take a good hard look at it. Butterfly looked so sleek and sexy - emphasized her low prowess and highlighted her custom paint like a gorgeous evening gown (if a motorcycle could wear one, that is).

Hello World


I am a three-season rider in NE Ohio, enjoying the world of motorcycling on a 2008 Yamaha V-Star 1300 Tourer, which I tremendously enjoy modifying and customizing this beautiful 80ci machine.